Tutorial: Query Microsoft Access
Tables using Excel for Mac
Part 4 - Get Your Data - Excel 2016
Tip: Use Excel 2011 instead, if you have it
By Jim Gordon, co-author of Office 2011
for Mac All-in-One For Dummies.
Now that you have set up
your data sources you can use them in Excel. There are big
differences between how this is done in Excel 2011 and
Excel 2016. Excel 2011 has Microsoft Query, a program
having a Structured Query Language (SQL) graphical user
interface (GUI). The GUI was cut from Microsoft Query
2016. If you do have Excel 2011, use that instead to
generate your queries.. If you have only Excel 2016,
before you do anything else, please click
here to vote to have the SQL editor restored.
Using Microsoft Query 2016 for
Mac
The syntax for SQL queries in MS Query is slightly
different from the syntax in Microsoft Access. Use examples
below to learn the subtle differences. On the Mac, MS Query
uses SQL-Lite. Unlike the Windows version of Microsoft Query,
you can not perform table operations. On the Mac, MS Access
provides read-only functionality and can't change the data
source database.
Microsoft Query interface tips
The following features were cut from Microsoft Query
2011 and no longer work:
There are no FIELD pop-up menus to
display
You can't SORT or add sort criteria for any chosen field using
the GUI
You can't FILTER data using a Filter in the GUI
You can't Right-click a Table to DELETE it from your query
Even if you scroll all the way to the right in this preview
window, you may not be able to see all the columns returned by
your query unless you move the mouse to the edge of the
rightmost field name and discover the hidden arrow. Drag the
arrow to widen the column..
You can not make parameter queries. Click
here to vote for and complain about this lack of
functionality.
In MS Query 2016, all you can do is type or paste SQL
queries to accomplish the above actions.
Example #1 – Import an entire table from
Microsoft Access into Excel 2016 for Mac.
1. Open Excel to a blank workbook
2. From the DATA tab of the Ribbon click the Database
button. Choose From Database.
3. The ODBC Data Source Chooser dialog opens.
4. Select a data source from the list, and then click the
OK button. Even if there is just one data source, you must
first select it in order to use it.
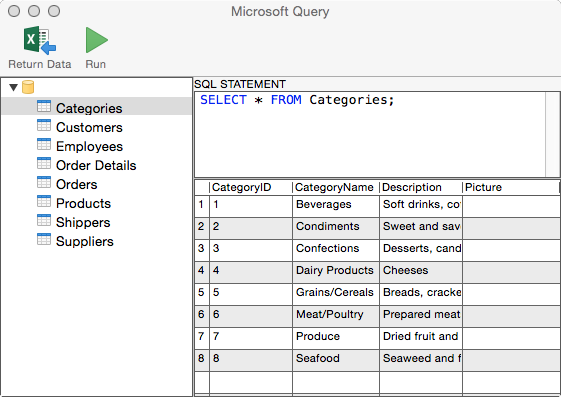
The Microsoft Query dialog will open (see Figure 1).
There is a main window divided into 3 panels: Tables, SQL
Statement, and Result Set Preview. The preview is generated by
clicking the Run button after you enter a SQL Statement.
1. Click the disclosure triangle
next to the folder icon in the upper left corner of the
dialog. The list of tables in your Access database will
display.
2. Clicking a table name will
generate a SQL query that selects all records from the
selected table. The SQL query appears in the upper right (SQL
Statement) panel of the dialog.
3. Clicking the green triangle (Run)
displays a sample result set (not the entire result set) in
the lower right panel.
4. Click the RETURN DATA button to
bring the complete result set table into Excel.
Figure 1
Example #2 – Filter Records
To filter records use a WHERE clause in your SQL
statement.
Figure 2
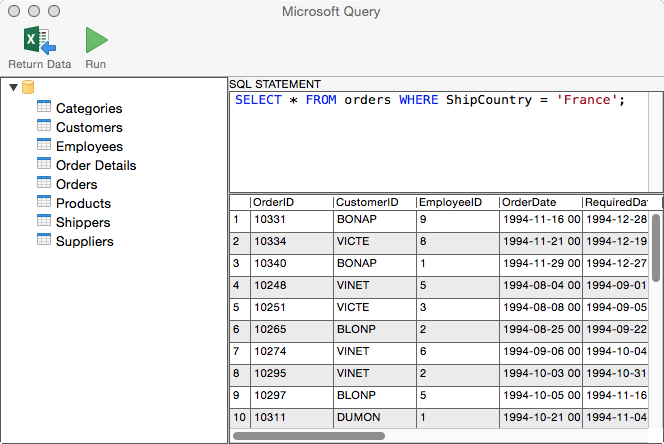
The query can be modified to
display only certain columns. Specify the table name along
with the column name. Pay special attention to the use of
parentheses and single quotation marks in the WHERE
clause. Note the final semicolon.
SELECT Orders.OrderID,
Orders.ShipCountry FROM orders WHERE (ShipCountry =
'France');
Example #3 – Multiple Table Query
By joining two tables
together, you can limit the result set that is returned to
eliminate duplicate records.
You can perform any SELECT query that Microsoft Access
supports. The
query shown in Figure 2 lists the names of everyone who
registered for any workshop and found the workshop
information from our brochure. Here is the syntax for the
query in Example 3. Again, note use of single quotation
marks and parentheses:
SELECT
Orders.Orderdate, Orders.ShipName, Employees.LastName
FROM Orders, Employees WHERE (Employees.EmployeeID =
'3');
It is possible to make queries that produce very large
number of records in the result set or a "runaway query"
that will never end. You will have to force quit Microsoft
Query to interrupt a query that is taking too long.
Example
#4 – Count number of records
This query's result set
tells you how many employees have last names in the
Employees table.
SELECT
count(Employees.LastName) FROM Employees
Example #5 – Match a text string
There is a SQL operator
named LIKE that will search through the text within a
field and return records that match the text string. This
example shows how to search for the word final in a field
called tblSoftware.Title. In this example we want to find
all the supplier contact names that have Ian in them.
SELECT
Suppliers.ContactName FROM Suppliers WHERE
(Suppliers.ContactName LIKE '%Ian%');
Example #6 – Return only unique records in the
result set
Sometimes a column will
have repetitive (identical or duplicate) records. To
return a set of records that contains only unique rows,
add DISTINCT to the SQL command. This example provides a
list of unique product names from the Products table:
SELECT distinct Products.ProductName FROM Products;
Example #7 – Group query results
Example 7 shows a trivial example of GROUP BY. You can
also use ORDER BY or any other valid SQL statement in a SQL
query.
SELECT
Orders.ShipCity FROM Orders Group By Orders.ShipCity
Example #8 – Make a PivotTable in Excel using
data from an Access database
Sorry, this is currently broken in Excel 2016 for Mac.
Use the Smile button in Excel's interface to add yourself to
the list of people affected by this bug.
Topics