Tutorial: Query Microsoft Access
Tables using Excel for Mac
Part 4 - Get Your Data - Excel 2011 (The way it ought to be in
2016, but isn't)
By Jim Gordon, co-author of Office 2011
for Mac All-in-One For Dummies.
Now that you have set up
your data sources you can use them in Excel. There are big
differences between how this is done in Excel 2011 and
Excel 2016. Excel 2011 has real Microsoft Query. Excel
2016 has nothing like it. This page is for Excel 2011. If
you are using Excel 2016, click here.
Using Microsoft Query
Microsoft Query is an application that comes with
Microsoft Office 2011. MS Query lets you create Structured
Query Language (SQL) queries using a Graphical User Interface
(GUI) or by typing queries in a SQL Query text editor. The
syntax for SQL queries in MS Query is slightly different from
the syntax in Microsoft Access.
Example #1 – Import an entire table from Access
into Excel.
1. Open Excel to a blank workbook
2. Switch to Normal view
3. From the DATA tab of the Ribbon click the Database
button
4. The ODBC Administrator will open.
You must click on a data source from the list then
click OK. Even if there is only one data source, you must
first click on it to select it in order to make a connection.
Microsoft Query will open (see
Figure 1). There is a main window divided into 3 panels. Also,
there is a window that lists the tables in the Access
database.
1. Select a table name and click the
Add Table button or double-click a table name and it will
appear in the upper part of the panel.
2. Change the FIELD selector to the
table name with the asterisk * to select the entire table.
3. Click TEST to display the records
in the bottom panel.
4. Click the RETURN DATA button to
bring the table information into Excel. Excel will offer a
variety of options that control how Excel will treat the data
once the import has been completed.
Figure 1
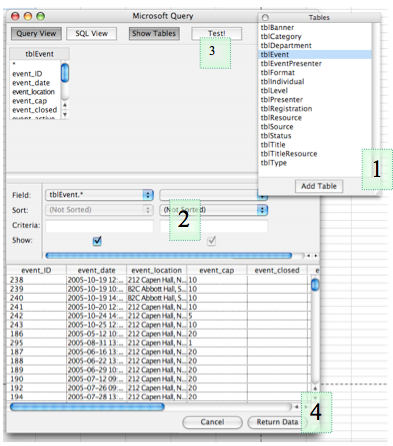
Microsoft Query interface
tips
In Microsoft Query columns and fields can be dragged
in the interface to change their order.
Click FIELD pop-up menus to
display and choose filed names fields.
Click SORT pop-up menus to add sort criteria for the chosen
field.
Type CRITERIA to filter data.
Right-click a Table to delete it from your query.
Click the TEST button to run your query and see the result set
in Microsoft Query.
Example #2 – Filter Records
The middle panel of MS Query panel is controls for
which fields will be selected and what criteria will be
used for the selections. This example shows Query View how to filter to
find records that contain the word “Brochure” from the
source-Name table of tblSource. See Figure 2.
Figure 2
Click the SQL View button to
display the query in the text editor of MS Query. Switch
between Query View and SQL View to discover syntax for SQL
queries. Query View is able to display only simple
queries. Complex SQL queries can be made only in SQL View. Here is the syntax
for query Example 2. Pay special attention to the use of
parentheses:
SELECT tblSource.source_ID,
tblSource.source_name FROM tblSource WHERE
(tblSource.source_name = 'Brochure')
Example #3 – Multiple Table Query
By joining two tables
together, you can limit the result set that is returned to
eliminate duplicate records.
To join two tables, first put two tables into the query.
Then, drag a field that both tables have in common from
one table into the other. MSQuery may prompt you for the
field names if it can not determine matched fields
automatically. See Figure 3
Figure 3

A line joining the two tables will appear. You can
double-click the line to edit the join.
You can perform any SELECT query that Microsoft Access
supports. The
query shown in Figure 2 lists the names of everyone who
registered for any workshop and found the workshop
information from our brochure. Here is the syntax for the
query in Example 3. Again, note use of single quotation
marks and parentheses:
SELECT
tblRegistration.reg_name_first,
tblRegistration.reg_name_last, tblSource.source_name
FROM tblRegistration, tblSource WHERE
(tblSource.source_name = 'Brochure') AND
(tblSource.source_ID=tblRegistration.reg_source)
Be advised that Microsoft
Query is a farily simple tool. It is possible to make
queries that produce very large number of records in the
result set or a "runaway query" that will never end. You
will have to force quit Microsoft Query to interrupt a
query that is taking too long. If you wish to make a
request for a more robust version of Microsoft Query, use
the Help menu in Microsoft Query and choose the Send
Feedback option.
Example #4 – Count number of records
This query has a result set
but can not be displayed in Query View, so you must type
it in SQL View.
SELECT
count(Reg_Event) FROM tblRegistration
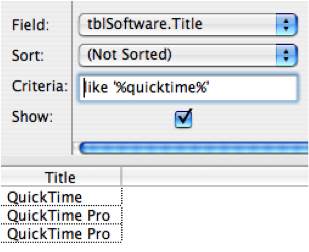
Example #5 – Match a text string
There is a SQL operator
named LIKE that will search through the text within a
field and return records that match the text string. This
example shows how to search for the word final in a field
called tblSoftware.Title.
To use the LIKE command, in the Criteria field type the
word like followed by a space then surround the search
characters in single quotes and percent signs as shown.
Notice the use of single quotation marks and percent
signs. Query View is shown in Figure 5:
SELECT
tblSoftware.Title FROM tblSoftware WHERE
(tblSoftware.Title like '%quicktime%')
Figure 5
Example #6 – Return only unique records in the
result set
Sometimes a column will
have repetitive (identical or duplicate) records within
it, like the example above. To return a set of
records that contains only unique rows, add DISTINCT to
the SQL command. You will need to switch to SQL view in
order to do this. Example adding DISTINCT to your query as
shown the example #5, then click the TEST button. You
can’t use DISTINCT in Query View.
SELECT distinct tblSoftware.Title FROM tblSoftware WHERE
(tblSoftware.Title like '%Quicktime%')
Example #7 – Group query results
The GROUP operator
works only in SQL View. Example 7 returns records
from the name table grouped by name
SELECT
tblRegistration.name FROM tblRegistration group by name
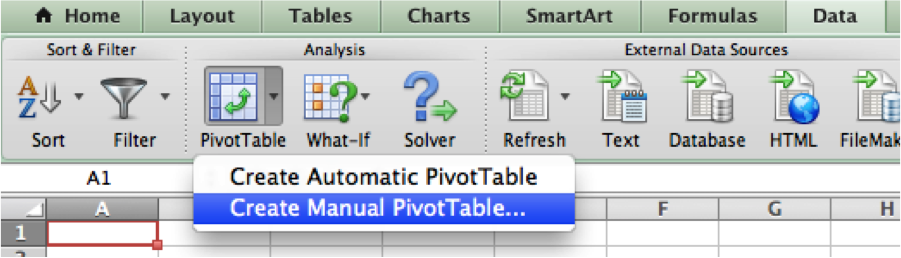
Example #8 – Make a PivotTable in Excel using
data from an Access database
On a worksheet in Excel, from the DATA tab of the
Ribbon, in the Analysis group, click the PivotTable button’s
triangle. From the pop-up menu choose Create Manual
PivotTable. See Figure 8a
Figure
8a
The Create a PivotTable dialog opens. In the Choose the data
you want to analyze section, choose Use an External Data
source. Then click the Get Data button to open the ODBC
manager and Microsoft Query. See Figure 8b.
Figure
8b

Topics
Jim Gordon's MVP
Home